Showing posts with label drugstore makeup. Show all posts

Saturday, June 9, 2012

Makeup Tips & Tricks That REALLY Work!


He ya'll so last week I read a blog  about this 30 day makeup challenge where you have a different task to do daily.

At first I was all psyched, like "Yeah, cool got me some new ideas! Totally gonna do this! " (said in radical white surfer dude voice), but here I am four days later and well, lets just  say it....FAIL! :)

So what I decided to do instead was pick and choose the tasks that I liked best and share my idea with you all. The first one that stood out to me the one about sharing tips and tricks that I may know....so here I go:

1. Concealer brushes were made for a reason! While I do believe you can use any brush for any task you want, concealer brushes are that perfect size to cover your problem areas. So ladies put down the spatulas, and brushes the size of your head and just use the tiny brush (or ur finger) to only cover the problem area. You save product and you avoid the cake face. So conceal, dab dab dab to blend edges...done

2. Clear Mascara isn't just for your lashes! It is also a great brow setter and a quick way to make your wispy fly-away hairs stay in place.

3. Lipstick is a multi-tasker! Lips, cheek stain, eye primer...it does it all.

4. Gloss=gorgeous lips! Just dab some gloss in the center of your bottom lip and BAM! sexy lips...OH add a small highlight to your cupids bow for extra plumpness

5. Bronzer is your friend! I was never a bronzer girl cause I always feared looking like Snooki or overdone. However, with the right color I found it can do wonders. Applied in a "3" motion on my round face and then WATCH OUT sexy face! (Plus I can now hide my double chin without dieting :)  OOOOO and if you dont want a powder bronzer, just buy a foundation colors a few shades darker and tada you got your self a liquid bronzer

6. Look wide-eyed with white: I think everyone already knows that if you put white liner on your lower inner lid that it will make your eyes look wider and alert. For me I find the white to be too harsh, so I  use a nude pencil which works the same way 

7. Baby Powder/Baking Soda to the rescue: If you are a grease ball or just lazy and don't like washing  your hair, use baby powder or baking soda to suck up all the oils in  your head. Get a small amount, work it into roots, comb out, done! (more suitable for lighter hair)

8. STOP smiling when applying blush! This is as an old school trick that we have all used but need to stop. When you smile your cheeks are higher, when you stop smiling they go back down. So while you might have thought you just applied some sexy blush to your gorgeous cheeks...think again because now its down to your jowls :)

9. Use mascara to cover your pesky greys! Enough said.

10. Make your own tinted moisturizer! Foundation+ Moisturizer=$ saved

11. Make your OWN exfoliator: Recipes everywhere online but basically sugar+oil/lotion= cheap natural alternative

12. No SPF for photos! I know this is controversial, but in order to avoid the ghost face in pictures, avoid makeup with titanium dioxide or SPF. Usually the setting powder is the culprit.

13. Brush your lips! For smooth kissable lips, gently exfoliate your lips with your toothbrush to buff off all the icky dead skin and apply a balm to finish off.

14. Layer you Mascara! Love the idea of water proof mascara but hate taking it off? Well first apply a regular mascara and then top it with a waterproof one. This way the water  proof formula locks onto the regular mascara and not your lashes making it easier to remove :)

15.Instant facelift! Go look at yourself in the mirror and smile. anywhere you see a shadow (upper and lower lip, corner of eyes) apply a small amount ofshimmer or off white color to give you a quick pick me up effect :)

16. Base coat and buff your nails! If you have ever worn nail polish only to find it stained your nails once you removed it, don't worry. Simply use a buffer to remove the stain and apply a base coat next time.

17. Burn you pencil Liner! When your pencil  liner dries out or breaks and you can't sharpen it, use a lighter to gently warm up the tip and within seconds, you got a functioning pencil.

18. Starighten Up! For extra volume when straightening hair, pull hair up and away from scalp instead of straight down for instant volume

19. Suck a finger! NOW DONT YOU ALL GET ANY WRONG IDEAS! LOL! when you wear a darker lipstick they have a tendency to get on your teeth. To avoid that after you have applied the lipstick, put you finger in your mouth like a lollipop, close mouth and pull finger out.  All the excess color will have come off on your finger :)

So ladies, these are just a few tips for you all to try if you  didn't already know them, I have TONS more to share  with you all, but I would love to read about your tips and tricks so please do share in the comments or make a post of your own :)

Ahhhh!!! THERE'S A SPIDER ON MY EYE!!!!


So a couple of weeks ago a friend of mine gave me a coupon for $5 off of any ebay purchase. Not having shopped on  ebay for months, I browsed, perused and SHOCK FACE!!!! Look at what I found!!!!

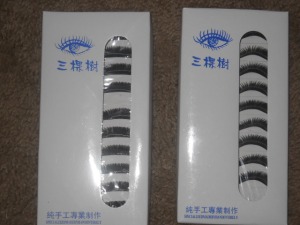
Ya'll I just bought two packs of 10 lash sets each and I don't even wear fake lashes...EVER!!!

So why waste my money on something I don't use? Because it cost me $1.98 shipping included!!!
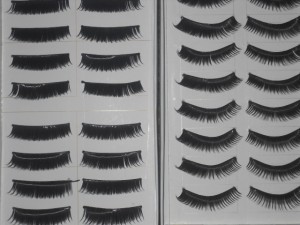
Excited I ripped open the boxes and this is what they look like inside. I bought numbers 127 and 128, and as you can see I've been playing dress-up with some of them :)

127 are dense all the way and very thick the 128 are more "natural" with a dense base and a slight flare towards the edges.

So what do I think:

Not being a lash wearer I feel these are a really fun product to experiment with.  Yes they feel heavy, look fake if not applied right and are the creepiest looking thing when you wake up in the morning and find them on your bathroom counter, but they give a great effect.
NAKED EYE vs DOLLED UP EYE
(I feel like the Asian woman on YouTube who shows the power of makeup  :) )

Both eyes have the same products expect left eye (your right) has lashes

FINAL WORD: If you have 99 pennies to spare I say order a pair!  My suggestion however,  if you are a newb to the fake lash world, is to start off with less dramatic lashes because they take a while to get used to. Plus because they are a little heavy they gave me a droopy eye kinda look, which would look really sexy with a smokey eye, but for an everyday look, I just looked stoned :)

Thursday, May 10, 2012

Seche Vite Anyone???


If you read my post "Confessions of a Nail Polish Junkie" then you know I have a serious nail polish addiction :) And  while I know this addiction is harmful both to my wallet and my poor roommate who has to smell the stench of polish almost daily, I just can't help it.

So while rummaging through my rainbow of colors  trying  to find the color of the day, I came upon Seche Vite, the over-hyped, over priced, fast  drying top coat that some manicurists swear by. So is it worth it???? Read on :)
Packaging: Clear nail polish top coat looking bottle with a normal sized brush.

Price: $7-$20 USD depending on where you buy it. OUCH!

Product/Application:

PROS:
  • After applying nail polish and all the bejeweling details you want, apply one coat of this sucker and VOILA! Dry in less than twenty seconds. No joke!
  • Bottle lasts a while depending on how much of a nail polish junkie you are :)
  • DRIES SUPER FAST
  • DRIES SUPER FAST
  • DRIES SUPER FAST
CONS

  • Price is crazy
  • Smell is HORENDOUS!!! It takes a while to get used to the  lacquer smell
  • Doesn't really help MY nail  polish last longer, and instead of chipping it does more of a peeling affect which is fun to remove like a sticker :)
Overall:
I REAALLLLYYY like this product. I think it does exactly what it says and who doesn't want dry nails within seconds :) However because it is pricey I hesitate to recommend it to my budget conscious beauties who read this  blog and are just looking for cheap, readily accessible beauty products. BUT if you want dry nails ASAP, got some extra bucks for a great top coat, then go for it.

As for me, I think after I finish my bottle I might hold off on  buying another because I change my nail polish SOOOO much, that putting on such an expensive top coat just is not worth it to me.

Friday, May 4, 2012

Sally Hansen Airbrush Legs


Woke up Monday, looked outside, nice sunny dress wearing weather. Looked down at nice white legs.....yeah not happening.

I'm not a fake tan kind of girl. I always found them to look so orange and fake on others that I never wanted to try it out myself. However, I'm a curious kind of spirit and I love trying new things and this month it just so happens I'm into dresses and dresses require a nice pair of legs.

Now while I'm willing to expose my thick hammy calves to the world, I refuse to subject the world to their blinding whiteness :)

So off I went to Target and picked up this little bad boy for $7 USD.

Packaging: Metallic aerosol container, product squirts out like thick hairspray

Product: As I said above the product is like a thick hairspray that kinda bubbles and foams, depending on how close you aim it. Basically you spray it into your  hands and rub  onto desired area. You can apply a light layer or thick, depending on the affect you are going for. The product does dry quickly so work in small patches and work fast. Also it says its water  proof, which it is to some extent. Just don't wear white or go swimming and you will be fine :) Oh,  use a hand soap and it comes off your hands easily when done applying.

Overall: I can honestly when I first tried this "tan in a can" I hated it! It made me look like I was wearing orange nylons and made my legs look like I had purposely rubbed foundation on them.  But then something wonderful happened. After about ten minutes, after the product had settled, my legs looked great :) The tan looked "natural"  and all the little discoloration I had from sports scars were covered. 

Whats more, I even got comlimented.....BY A BOY!  (it was a good friend of mine who I adore)

So should you buy it....yeah why not. You have to work with it a little, but remember to use a light hand and pick the right color for the affect you are going for and you'll be fine.

SIDE NOTE: This is just a cosmetic fix product so with gentle exfoliation it washes off easily so if you are looking for a long term tan then this is not for you, but if you just want a quick tan for the day then go for it :)

I wore my tan all week but forgot to take pics, so here's a borrowed picture from online showing how the tan works.

Friday, April 27, 2012

NYX Lip Product Review/Rave


OH NO!!!!! Ladies..ladies...ladies, tisk, tisk, tisk. I'm ashamed to even be telling you all about this, but today during lunch with my girlfriends, while taking pictures....I made..THE DUCKFACE!!! AHHHHHH!

But I SWEAR on all my makeup, I have never done this before! I don't know what happened, one minute the nice waiter was saying  "say cheese,' and the next my lips took on a life of their own and.....sigh, the duckface.

But you know what, after looking at my atrocious picture  and thinking about why in the world I would pose my face in such an idiotic manner, I realized I am not to blame. It was my lipgloss! Yes, ladies, my lipgloss made me do it! :)

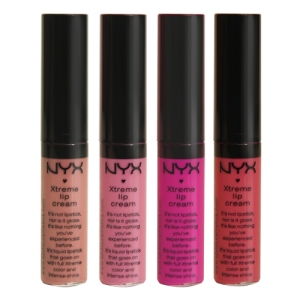
NYX Extreme Lip Cream
 
Packaging: Typical. Tube & doe foot applicator. One interesting thing though, the cap is almost the same size as the container the product is in

Product: This is exactly as described on the packaging. This is not a lipstick, this is not a lipgloss, but rather a really creamy combo (haha eww). It's a liquid lipstick and the lasting power of this sucker is  crazy! I put it on in the morning and by lunch time all though it was a little faded, the color was still there.
(This is BUTTERY NUDE a really nice mauve/coral combo, an exaggerated version of my natural lip color)

So why the duck face? Because I loved the way my lips look with this product on. It's a little glossy, a little matte, very pretty.

Overall: Buy it, Try it :) I bought one to try, and loved it so much I am going to go buy more. A little tip though, they can be a little drying at first so make sure lips are very well hydrated and do not just gloop this product on like a lipgloss! It is very thick and dense so I normally just dab dab dab, and press my lips together.
:) :) :) :)

Saturday, March 31, 2012

E.L.F Eyelid Primer

I put some eyeshadow on, eyeshadow comes off. So, I put more eyeshadow on, even more comes off. WHAT THE HECK IS GOING ON!....My darn oily eyelids is what is going on :)

I just recently got into makeup, and one of the first products I bought was cheap eyeshadow, because I thought that would make the biggest difference in my attempted dramatic change. But instead of these epically awesome eyeshodow colors sparkling on my eyes, hence captivating all the boys attention, I managed to create clumpy, chalky  messes all over my eyelids.

What  I figured out eventually was my  greaseball butt needed to use some eyelid primer to help my eyeshadows stick and last all day. Therefore, I began my journey on finding the perfect  eyelid primer.
What I discovered however, was that primers work almost the same, and while I do own higher end primers, I can't afford to use them eveyday, so I found this E.L.F eyelid  primer, which in my opinion is a great substitute :)
Packaging: The primer comes in a typical tube type of style. with a doe foot applicator. The color comes off very beige-ish and the consistency is comparable to that of a liquid foundation.

Product: After applying the primer, I usually wait about 20 seconds to let it dry just a bit, and then I apply my shadow however I wish. For a typical 8 hour work/school day, this primer fairs pretty well. I have some creasing and color lose by the end of the day, but you  have to remember I have greasy eyelids. On the other hand, my sister also uses this product and has normal/dry eyelids and this primer helps her eyeshadow stay on all day perfectly fine.

Overall: If you are looking for a cheap eyelid primer, that has no gimic and does the job, then this is the product to try. It stays on for a long time and even with the eventual creasing at the end of day, its well-worth the $1-$3 USD!
:) :) :) 1/2

Massive E.L.F Lip Product Review!!!!

When I first started experimenting with makeup, E.L.F is the first place I went, and ladies let me tell you, this company was NOOOOO WAAAY  and as nice as  it is today. They had like 10 products, all just low quality and gross.

I tried to be the shiz nits and wear their pressed powder to school one day, and instead of the "oooooooo's" and "aaahhhhh" that I wanted, I got "ewwwwwwwww's" and " "Are you ok, you look really sick." (Later realized the powder had formed ghostly patches and made me look like I was peeling)
However, in the past few years, they have really listened to their customers and have created some really nice products :) Here is my mass review of lip products that I have tried.

Lip Primer/Plumper
For some this is their go-to product, for others this is trash. For me personally, I  noticed  nothing too different. Yes, it helped prime lips, but it came off in a waxy consistency, and I saw no plumping.

Lip stain:
These are part of the E.L.F  '12 spring line. Typical lip stain design, you color you  lips and you are done. I felt these stains had a nice color pay off but they were very drying . Not a lot of color selection.

Hypershine Gloss:
To me these are very similar to the  Stilla Lipglazes. For $1 USD these are great. They come in a variety of  colors, supper glossy and the color payoff is just enough. Yes, they don't last as long as you would like, but come on, what gloss stays on for that long anyways? Most definitely give these a try.

Plumping Lipglaze:
Don't fall for the name, there is nothing plumping about these lipglazes. They are dual sided, one for the color, one for the glaze. I found the colors to be cute  but gloopy and the glaze nothing more then a shiny gloss.  There is a pepperminty taste to the product and the methanol does help give the illusion of slightly plumper lips for like 10 minutes.

Mineral Gloss:
Part of ELF's mineral line, these  glosses are great. They come in a nice range of colors, and they go very smoothly. The lasting power is like that of any gloss, but I think they are well worth the price. My only complaint is that some have shimmer in them so when you apply them you can sometimes feel the particles on your lips. These are a staple in my purse.

Lip Shines:
Once again, some girls love them, others hate them. I'm divided between the two. I think the color selection is great, very moisturizing and easy to travel with. However, I find them to be thick and a bit messy. I recommend these more for girls in high school or college who need something cheap that gives quick color. Nothing special.

Essential Lipstick:
Love these! For just $1 USD each, these lipsticks are awesome. A little difficult to work with when first applying, these lipsticks not only have great color payoff, by lasting power as well. For me at the end of the day, they leave a really nice stain like effect. Plus with the huge color selection, there is something for everyone :)

Mineral Lipstick:
My favorite E.L.F lip product :). These lipsticks are smooth, moisturizing and long lasting-ish. Rosy Raisin is my go to lipstick and I absolutely love it!. The color payoff is great and once again with the huge color selection, there is something for everyone.

Friday, March 30, 2012

ELF Studio Line Blushes with Swatches

Okie dokie, so the last couple of nights, I have been up till almost 1am reading beauty blogs. Why? I don't know, I'm just weird like that, but because of my sudden fascination with reading blogs, I have gotten a good feel about what products people are blogging about. One surprisingly controversial product I have  read about are the E.L.F Studio Line Blushes. While some girls swear by them, others loathe them. So here's my review, hope it helps y'all out :) (Yup, a Cali girl just said y'all)

Okay so I own three of the Studio Line blushes:

Tickled Pink: A gorgeous baby pink, that can be built up to a true cotton candy color (this is my current favorite)
Candid Coral: A beautiful coral/peachy color. It is VERY similar to NARS Orgasm. It has small shimmer particles making it a really nice highlight on darker toned women. I usually layer this over other colors for a nice glow.
Blushing Rose: This is really nice berry colored blush. I use mostly around the holidays, but it's still a great buildable color. This one has small gold flecks which look really nice when they catch the light, yes even on oily skin :) Don't worry they are so small, you won't look like a disco ball.

Packaging: The blushes come in a rectangular black case. In my opinion the packaging is a knock off of the NARS, packaging, but then again, most of E.L.F's packaging is a knock off of a higher brand. Becareful when handling these blushes they break very easily. As you can see from my pictures, I've done some damage :)
Product: Here's where the trouble begins. While some girls complain that the blushes are to rough and chalky, others rave that they are so pigmented and soft. In my opinion, it depends on the color. While some colors are chalky and others are soft, I feel they are all very wearable and workable. For example, on of favorite blushes is Tickled Pink. It's a light baby pink, gorgeous color, but it is very chalky. I have to swipe with my brush a few times to get some color, but the color that I do get is really really nice.

Price: $3 USD

Overall: It's a luck of the draw. I personally love theses blushes because they are so cheap, blendable and versatile. Yes, some of the blushes are chalky and maybe a little difficult to work with, overall, E.L.F offers a beautiful range of colors, that you really can't hate on. So, in my opinion, I would say give these blushes a try, all you gotta loose is $3, and when you compare it to some of the $25 USD that the blushes are dupes are for, these are a real steal. Plus, they are surprising very long lasting. For a girl, whose face looks greasy within and hour, these blushes last me all day without fail :)
:) :) :) :)

PS: Sorry for the low quality pictures, bad lighting + cheap camera = bad pictures

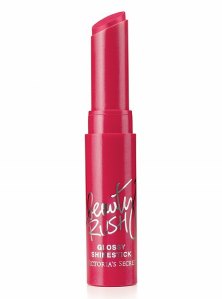
Beauty Rush Glossy Shinestick

Ohhhhh Victoria's Secret how you did me wrong!!!! You suckered me in with your yummy  smells and frilly undies and blinded me into buying a lip thingy I didn't even waaaaaannnt.


Alright I'm a typical chick. I like all sorts of pretty frilly things and when I saw these colorful glossy lip shine thingy's I was all over them. Not only did they come in an assortment of colors but FLAVORS as well. Pina colada, cherry, berry, strawberry, yum yum yum!

But that's where the fun stops (READ IN EPIC DOOM VOICE)

Packaging: Typical lipstick style wind up design with clear cap. Very slim and compact making them easy to travel with.

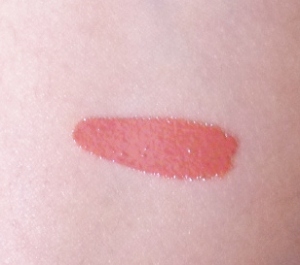
Product: The texture is almost that of a thin lip balm. It slides on fairly easily,  but some of the shinesticks have glitter which makes the texture a little rough when applying. 

Payoff: The colors are fairly pigmented. They give a tinted balm affect which is really nice because it looks very  natural.

Overall: Don't do it ladies, don't get suckered in by the heavenly feminine store. This product SUCKS! For the first few days I fooled myself into thinking that these shinesticks were awesome and that I looked like Miranda Kerr in the ads. Yeah, FAIL! The product exaggerated the lines and cracks in my lips and after a period of time they dried up my once hydrated lips. They had weak lasting power and overall were just blah. However, I still love the smells and they don't taste half bad.
If you own these and have found a way to make them work for you, please share! I'd hate to waste the four that I bought.
:)

Wet N Wild Color Icon Palettes...Discontinued????

Ladies.....ladies.......ladies. My heart is a little broken today. Not only did I wake up to rainy, gloomy morning, but yes its true, Wet N' Wild is discontinuing their color icon palettes!......Maybe.


Alright,  so if you live under a rock or possibly in a remote jungle in Asia, you probably have not heard of the Wet N" Wild color Icon Palettes. However, for the remainder of the world, these palettes have been accessible for the past two years. Once deemed the worst drugstore line, Wet N' wild not only reinvented their image but their products as well and invented one my "holy grail" products.

Product: Over the past few years, there have been about six different palettes that have been released to the public. While some of them were specifically for holiday promotions, the Vanity (pictured above), Lust (purple hues), Pride (combination of blues and greens) have always been available year round. Included in each palette are six shadows, ranging from matte, frost and shimmer. The shadows themselves are SOOOOOO  pigmented and soft making them very blendable and wearable. Mix and match as you choose from any palette because  the colors complement each other so well


Packaging: There is no gimic. Simple plastic casing with six shadows and two applicator brushes, which compared to other brands, are not half bad if you use a light hand with them.

Pricing: $3-$6 USD depending on location and availability.

Overall: Seriously if you do not own at least one of the color icon palettes, go and get one! The product is phenomenal and the product is unbeatable! Plus if you are a fan of MAC cosmetics, the palettes have some great dupes for neutral colors! 
As far as Wet N' Wild discontinuing their most successful line  EVER......eeehhhh, not sure. But just as a precaution, you can bet I'm going to be stocking up on backups :)
:) :) :) :) :)